CNC routers make it easy to create intricate pieces of furniture with the use of a computer. You can create musical instruments, signs, cabinet parts and relief carvings. A CNC router can also be used for cutting and shaping wood. This article will cover some of the different ways that you can use a CNC router at your desktop. Continue reading to find out how you can start. Also, learn how to get started using a desktop CNC-router.
Make intricate musical instruments
CNC woodworking machinery creates elaborate musical instruments. The machines are capable of creating complex designs that can help save time and money. These machines are capable of creating musical instruments with high repeatability. They can also do intricate work faster. Music instrument makers can create high-quality work faster by using CNC technology. Here are some of these benefits:
Music instruments that are intricate require precise cutting to avoid distortions and create a range in tones and sounds. CNC woodwork lets busy artists focus on the details of their instruments, rather than spending hours doing repetitive tasks. By using this tool, music makers are able to create one-of-a-kind musical instruments that are aesthetically pleasing and sound great. CNC woodworking tools are not able to replace the manual labor required to make musical instruments but they can improve production efficiency and creativity.
Cutting cabinet parts
The precision and automation of CNC routers make them popular with professionals as well as hobbyists. These routers can be programmed with a wide range of materials, including wood. Many are capable of making cabinetry from multiple pieces of wood. The CNC woodwork router will help streamline the whole cabinetmaking process. The CNC woodwork router can cut the pieces faster using specialized software. You will be able to concentrate on other tasks during the runtime.
CNC woodworking can cut cabinets parts more precisely and efficiently than ever before. These machines are built to be extremely accurate and can help you create elegant and beautiful cabinets with incredible precision. CNC wood routers, unlike manual woodworking machines, relay the inputs of computers to produce precise cuts in a fraction time. CNC work is also more accurate than manual processes. This makes it possible to get a perfect cut every time.
Signage
CNC woodwork can be used to create signs. Signs are more than decorative. Signs are not only decorative, but also serve a practical purpose such as marking important dates. For example, you can make a sign for your business with your company's logo. A great way to mark important dates such as an anniversary or graduation is CNC woodworking for signs.
CNC routers are capable of cutting materials of different thicknesses. Some models can be programmed with multiple tools. Multi-tool machines make it easy to create intricate signs. The Carbide 3D Shapeoko 4 CNC router has a large work area and is perfect for sign-making. It also includes software that is specifically designed for sign-making. You can also use it to create intricate signs with its high accuracy.
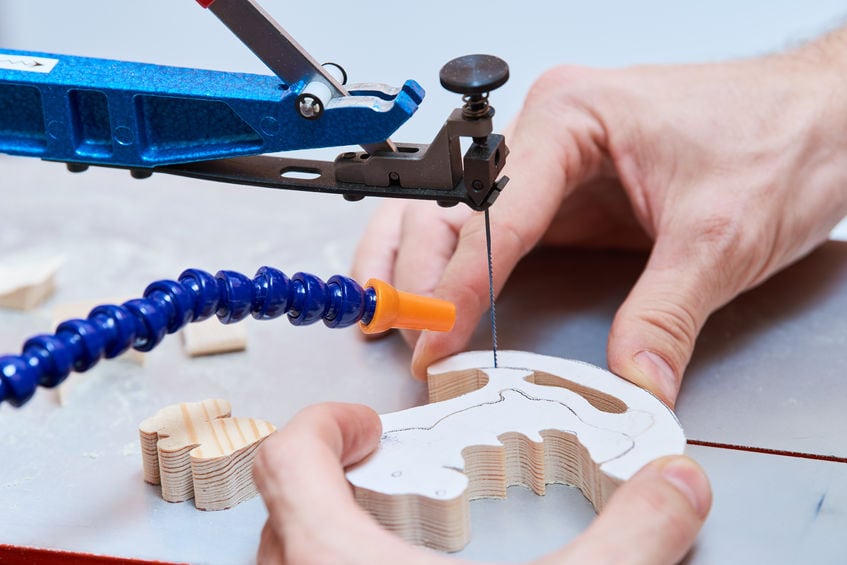
Carving relief
CNC woodwork can be used to create relief sculptures. You can also use the CNC router for making intricate designs and relief sculptures. The Latin word "ruas", which means "to raise", gives the CNC router its name. This form of sculpture has a lot of features, including narrative and descriptive functions. Unlike free-standing sculptures, relief sculptures offer plenty of support and areas for your workers. You can even sculpt directly on the place you want to finish. Relief sculptures are becoming increasingly popular for decorating places, no matter how small or large they may be.
Relief sculptures come in two types: high and low relief. The first is subtler and more prominent, with sharper outlines. The Egyptian style of low relief is often used, but small ivory reliefs can be carved in India using the same technique. This is a common technique used in religious art. It is usually easier to produce than low relief carving. The CNC woodwork machine includes bits that will help you create the perfect decoration.
Use a CNC router

If you're considering purchasing a CNC router for woodworking, you'll be pleased to know that these machines are incredibly versatile. You can use them to cut, drill, engrave and carve materials from a wide range of hard materials. Some models can even be used to cut non-ferrous materials, like 360 brass. These machines also have dust collection systems. A CNC router for woodwork can be a wonderful way to produce precise and high quality cuts that will last many years.
Remember that each material will have its own set parameters, so you may need to adjust the CNC router accordingly. Certain CNC routers are capable of producing good cuts at higher feed rate, while others need lower feed rates. Chip load, or the size and shape of the router bit, will vary depending upon the material and wood. If you have any questions about how to calculate chip loading, please consult the instructions provided by the manufacturer or an online calculator.
FAQ
How do I choose the right tools for me?
It's important that you consider your needs and preferences while shopping for tools. Are you more comfortable with plastic or metal handles? What size of nails and screws do your hands use most? Do you prefer to use hand tools or power tools?
Are you able to teach yourself woodworking
You can learn everything best by doing. Woodworking is an art form that requires patience, practice, skill, and experience. It takes time to master any craft.
The best way to learn how to do something is actually to do it. Start small, and work your way up from there.
What kinds of woods are good for making furniture?
Woods are classified according to their hardness. Softwoods include cedar and pine as well as cedar and cedar. Because they resist rot, softwoods can be used to make outdoor furniture. You can find hardwoods like oak, maple, mahogany, teak, and others. They can't withstand the elements outside so they're best kept indoors.
How much should a skilled woodworker earn per hour?
The hourly rate for a professional Woodworker will vary depending on many variables, such as experience, skill level and availability.
The average hourly rate for a skilled woodworker ranges from $20-$50 an hour.
A less skilled woodworker can charge as low at $10 an hour.
How can I learn basic woodworking skills
A great way to start learning how to build furniture is by building a simple bench for yourself. This project can be completed with whatever wood you have available at home. If you aren't sure what type of wood to use, you can buy cheap pine boards from Lowes or Home Depot. After you've built your bench, you'll want to sand off all the rough edges and finish it with a stain or varnish.
How can I tell what kind of wood I am working with?
Always verify the label on wood purchases. The label should provide information about the wood species, moisture content, and whether preservatives have been used.
Where can I find my woodworking tools?
There are many places that you can find all the information you need. For example, you could visit local hardware stores or look online at websites like Amazon.com.
You can also look for used furniture at flea markets or garage sales.
Statistics
- In 2014, there were just over 237,000 jobs for all woodworkers, with other wood product manufacturing employing 23 percent; wood kitchen cabinets and countertop manufacturing employing 21 percent. (theartcareerproject.com)
- The best-paid 10 percent make $76,000, while the lowest-paid 10 percent make $34,000. (zippia.com)
- If your lumber isn't as dry as you would like when you purchase it (over 22% in Glen Huey's opinion…probably over 10-15% in my opinion), then it's a good idea to let it acclimate to your workshop for a couple of weeks. (woodandshop.com)
- The U.S. Bureau of Labor Statistics (BLS) estimates that the number of jobs for woodworkers will decline by 4% between 2019 and 2029. (indeed.com)
External Links
How To
How to stain wooden surfaces
Staining wood is the process of applying chemicals to the wood's exterior, which alters its color. This chemical reaction changes the wood's color from white to brownish. Oak is the most common wood type for staining. However, you can also use other wood types.
There are many options for applying stains to wood surfaces. Some methods include mixing the stain along with a solvent like turpentine and then applying the mixture to the wood by brushing or spraying. Other methods use a solution of water and dye applied directly to the wood. You can also mix stains with varnishes or paints so that they become part the finish coating.
Preparing the surface for staining wood is the first step. Clean the wood to get rid of any grease, dirt or other substances that might be detrimental to the stain's application. Sanding can smoothen out scratches and uneven spots. Next, you need to decide which stain you want. There are two main kinds of stains available: non-penetrating stains and penetrating. Penetrating stains penetrate deeper into the wood than non-penetrating ones, making them ideal for dark colors such as mahogany. Non-penetrating oils work best when used with light colors, like maple.
After choosing the type and application method you prefer, gather your tools. You can use a paintbrush to apply stains. This allows you spread the liquid evenly over the surface. You should also have some handy rags to wipe up excess stains after you finish painting. If you plan to mix the stain yourself, make sure you have enough containers available to hold the different components of the mixture.
Once you have prepared your materials, start by cleaning the area where you plan to stain the wood. Clean the area with soap and warm water to get rid of dirt and grime. You can wipe down the entire furniture using a damp rag with clean water. Be sure to get rid of all loose material, especially if staining is planned for darker wood.
Apply the stain. Begin at one end and spray or brush the stain on the wood. You should work slowly and carefully. Continue moving along the grain until you reach your opposite end. The stain should not drip off of the wood's edge. Let the stain dry completely before proceeding with the next steps.
Clear polyurethane is used to protect the painted surfaces. Apply three coats of polyurethane sealer. Let the third coat dry overnight before you sand the final coat.