Before you begin cutting picture frame pattern, it is important to understand the basics of a Scroll Saw. This article will guide you through how to use your scroll saw to cut patterns. This article will also explain how to make picture frames with scroll saw patterns. Before you start cutting with a scrollsaw, you will need one. Make sure the scroll saw you are buying is the right size.
Basics of scroll saw
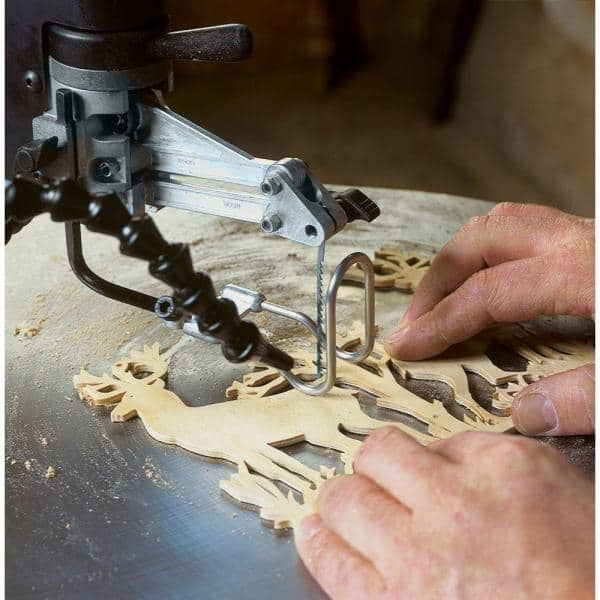
Scroll saws can be used to create beautiful wooden frames or picture holders. There are two types of scroll saw projects. They can be used to make wall hangings or flat, tabletop displays. Both of these types of projects will require you to cut multiple pieces from wood with different sizes. You will need multiple layers of wood to create a 3D scrollsaw pattern.
Before you can start cutting, it is important to choose a scroll saw template that suits your level of skill. There are thousands of free patterns available online. Some patterns are easy to follow, while others require more skill. These patterns are very easy to follow and there is a pattern for everyone. You can finish your frame with lemon oil or wood varnish to protect it from damage.
A simple scroll saw project that can be done in one go is the Noah's Ark puzzle. This pattern is available in printable format, so it's an excellent way to test your skills. If you prefer a puzzle, there is a variety of printable patterns available. A VW Beetle Puzzle can be made if you're not familiar with using a scrollsaw. It's not only decorative; it's also great for mental training! If you are looking to save time and have a simple project, a tutorial or professional scroll saw design is the best option.
Basics of using a scroll to cut patterns
If you're considering tackling the craft of making your own wooden picture frames, you may want to try learning how to cut picture frame patterns with a scroll saw. Patrick Spielman's book contains many new patterns that you can attempt. This book is unlike any other on the subject. It contains over 30 patterns and each one uses a different scrolling style. You will learn how to size, copy and transfer patterns.
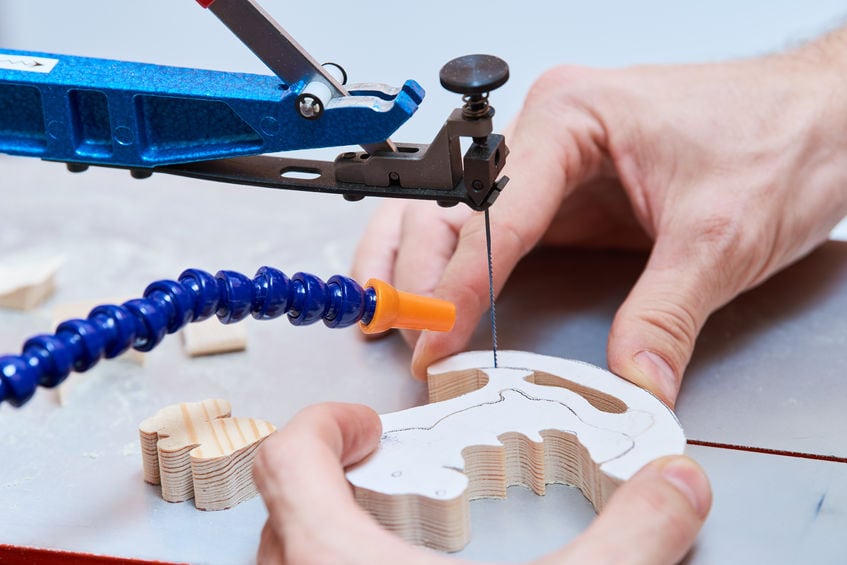
A scroll saw is a great tool for creating picture frame patterns. Many of the most popular picture frame patterns use this technique. This makes it more precise as the pieces will nest together when cut. By tilting the table, double beveling can be achieved. This type is also known "artistic timberworking" and is ideal for those who are new to the craft.
A scroll saw can easily be purchased online for below $40 Scroll saws available online are usually basic models that have been around for a while, but they are in good shape. Online purchasing a scroll saw is a cost-effective way to learn how cut picture frames. There are a variety of websites where you can purchase used scroll saws. These websites can be used by woodworkers with a limited budget. They offer a wide selection of models at different prices.
Basics of making picture frames with a scroll saw
Making picture frames with a scroll saw can be challenging and requires an extensive knowledge of the tool. This book explains basic scrolling techniques as well as examples of various styles of picture frames. All picture frames have two main boards, despite the name. The main board has a frame opening and a smaller picture frame glued on top. This book is a wonderful guide for beginners, despite the complex steps involved.

This book contains many project ideas for beginners to the scroll saw. This book contains 32 designs that can all be made with the scrollsaw. Each frame design has many variations. Because no two frames are the same, the book can be used as a pattern book. Here are some techniques you can use. Once you have mastered them, you will be able to experiment with various scrolling methods until you find the one that is right for you.
FAQ
Where can you buy hardwood lumber?
Home Depot offers hardwood lumber. They sell all kinds of wood products, including flooring, cabinets, furniture, etc.
You can also find a large selection of engineered hardwoods like Ipe (Araucaria Angustifolia), Brazilian Cherry, and Mahogany in their collection (Swietenia Macedonilla).
These woods are available online by searching Google for "hardwood lumber".
How long does a piece take to finish?
It depends on the type of wood you choose, the complexity of the design, and the amount of finishing you apply. Hardwoods, for example, require more maintenance than softwoods. Hardwoods are more expensive than other woods. They last longer and are more resistant to moisture. Finishing furniture can take anywhere from one week up to three months.
What kind of tools are used to carpenters?
A hammer is the most commonly used tool by carpenters. The hammer is used to pound nails into wood. This helps to keep pieces together when they are working on a project. Other tools include clamps.
What furniture can I refinish?
Yes! There are many different ways to refinish older furniture without the need for professional help. Here are some examples:
Sandpaper can be used to remove stains and scratches. Then wipe down the surface with a clean cloth.
Apply clear polyurethane varnish. Let dry completely before moving furniture around.
Use acrylic paint to paint furniture.
Use stain instead of paint. The furniture will have a rich look thanks to the stain.
Apply shellac wax. Applying wax will give the wood shine and protection.
Can this be a way to make money?
Yes! In fact, many woodworkers already do. According to the U.S. Bureau of Labor Statistics, the median annual woodworker wage was $34,000 in May 2012. This is significantly higher than the national average, which is $31,000 per year.
How do you calculate woodworking prices?
Remember to keep costs as low as you can when calculating project costs. Make sure you're getting the best prices on materials. It's also worth taking into account all the other factors that may affect the cost of your projects, such as time, skill level, and experience. If you want to get an idea of what you can expect to spend on different types of woodwork projects, check out our guide to the average price of common household DIY tasks.
Do I need to be a genius to succeed in woodworking?
No. It is not rocket science to woodwork. You can create beautiful pieces of art by learning how to use simple power tools.
Statistics
- Overall employment of woodworkers is projected to grow 8 percent from 2020 to 2030, about as fast as the average for all occupations. (bls.gov)
- In 2014, there were just over 237,000 jobs for all woodworkers, with other wood product manufacturing employing 23 percent; wood kitchen cabinets and countertop manufacturing employing 21 percent. (theartcareerproject.com)
- Woodworkers on the lower end of that spectrum, the bottom 10% to be exact, make roughly $24,000 a year, while the top 10% makes $108,000. (zippia.com)
- The U.S. Bureau of Labor Statistics (BLS) estimates that the number of jobs for woodworkers will decline by 4% between 2019 and 2029. (indeed.com)
External Links
How To
How to stain wood
Staining wood is the process of applying chemicals to the wood's exterior, which alters its color. This chemical reaction causes the wood to change from white to brownish red. Oak is the most commonly used wood for staining, but other woods can also be stained.
There are several ways to apply stains to wood surfaces. You can mix the stain with a solvent, such as turpentine, and spray it onto the wood. You can also apply a solution containing water and dye directly to the wooden surface. The stain can be mixed with paints and varnishes to become part of the final coating.
Preparing the surface is the most important step in staining wooden surfaces. You must clean the wood well to remove any grease or dirt that might interfere with the application of the stain. Sanding smoothens scratches and rough spots. The next step is to determine the type of stain you would like to use. There are two main kinds of stains available: non-penetrating stains and penetrating. Penetrating and non-penetrating wood stains penetrate deeper than other types, making them perfect for dark colors like mahogany. Penetrating stains are best paired with lighter colors, such as maple.
After choosing the type and application method you prefer, gather your tools. Paintbrushes are great for applying stain because they allow you to evenly spread the liquid across the surface. After you're done painting, make sure to have some rags handy to remove any excess stain. If you plan on mixing the stain yourself make sure that you have enough containers to hold the different components.
Once you have prepared all your materials, it is time to clean the areas where you will stain the wood. You can remove grime and dirt with warm water and soap. Use a dampened rag and clean water to wipe the furniture. Take care to remove all debris and dirt, especially if you are planning on staining darker wood.
Apply the stain. Next, apply the stain to the furniture by starting at one end. Work slowly and carefully, moving back and forth along the grain of the wood until you reach the opposite end. Make sure that the stain does not drip off the edge of the wood. Allow the stain to dry completely before you move on to the next step.
Protect the painted surface with a coat polyurethane paint sealant. Three coats of polyurethane sealing agent are required. Let the third coat dry overnight before you sand the final coat.